How to Add a New Fixed Asset
-
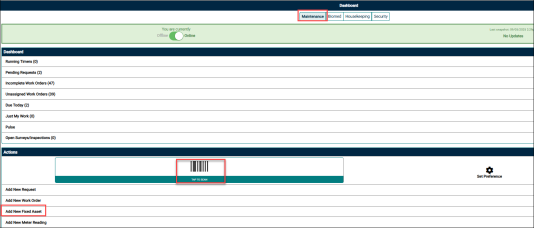
Log in to the Mobile Worx.
-
Under the Actions section, tap Add New Fixed Asset.
Alternatively, tap the Tap To Scan and scan the barcode to add the asset.NOTE If barcode not found then you can assign new barcode to items such as New Asset, Existing Asset, New Inventory, and Existing Inventory.

-
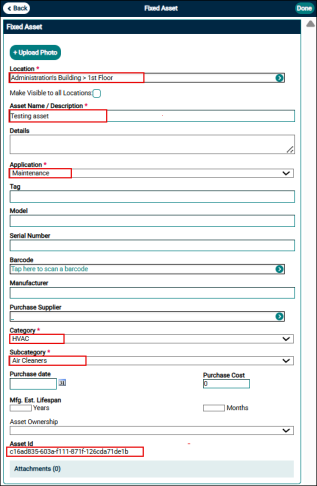
Enter the location name, select it from the Location drop-down list, and tap Done.
-
Enter Asset name/Description.
-
Select the Application from the drop-down list.
-
Select the Category and Subcategory from the drop-down list.
NOTE
* Asset Id generates automatically after the asset is created and remain constant throughout the asset's lifecycle, regardless of changes to other asset properties.
* Asset Id is a Global Unique Identifier (GUID) that serves as a permanent and standard reference for each asset. It enables synchronization, auditing, and integration with external applications by providing a consistent and unique identifier for each asset. -
Optional fields you may fill (if applicable):
-
Tag
-
Model
-
Serial Number
-
Barcode
NOTE You can enter a barcode in one of two ways:
1. Manually enter the barcode number.
2. Use a barcode scanner:
a. If scanning a third-party barcode, it will automatically populate the barcode field.
b. If using TheWorxHub barcode, this will need to be generated from the Desktop.-
Manufacturers
-
Purchase Supplier
-
Asset ownership
-
Purchase date
-
Purchase cost
-
Mfg. Est. Lifespan
-
Asset Ownership
-
Upload photo
NOTE Upload a photo only after saving the asset.
-
-
Tap Done at the upper right corner of the screen.
